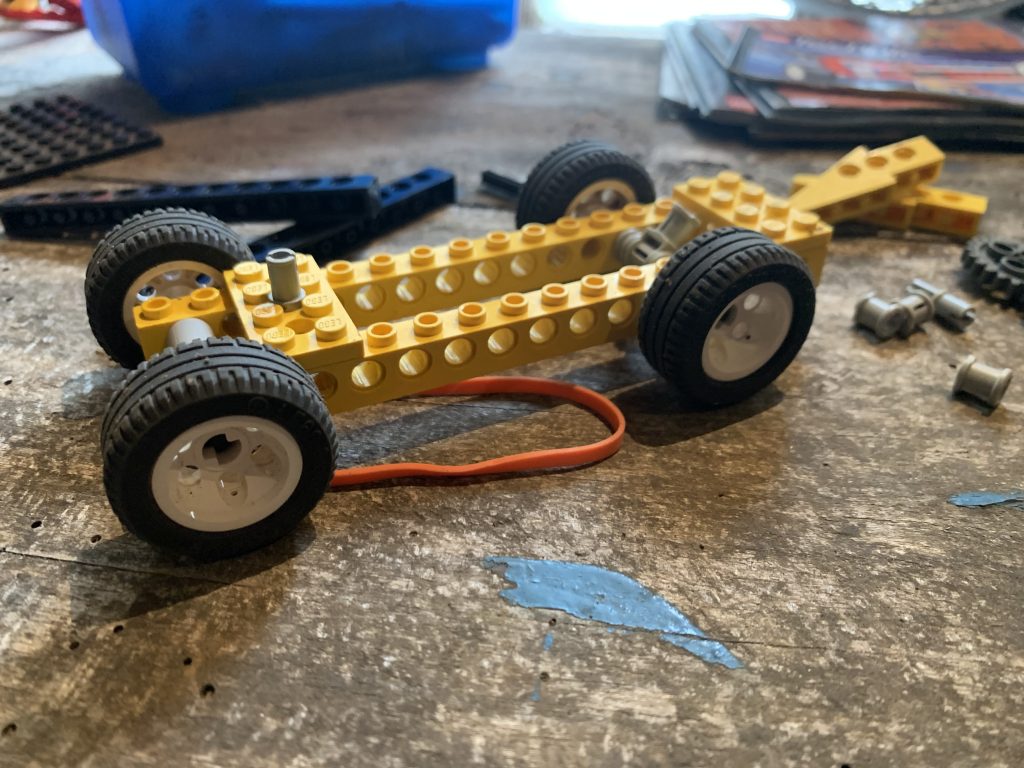
Lego Sense: Elastic Band Powered Lego Car
Hello! I’m Nick – welcome to our first online Lego Sense activity! As some of you may know, before Covid-19 hit, I was providing after school clubs and holiday camps, where children got to learn all about creative engineering using Lego! We were so sad that we had to stop, like so many other activities, and we really miss the children that were coming to our sessions! But, times are different at the moment, and we have decided to provide our Lego Lessons online, for everyone to enjoy! So let’s get started with our first activity…
The aim of this class is to use elastic power to move our Lego figure in his car, across the room – hopefully at some speed!
This has to be one of my favourite Lego Sense sessions; our groups of young engineers had so much fun creating these machines and watching them speed across the room.
During all the fun, we can learn about physics and the different types of energy, friction, problem solving, and more – sometimes without even realising it.
It’s definitely best to learn whilst having fun, and this is so much fun!
The Theory
Here’s some theory behind what we are doing and learning:
– When we pull or wind the band we create potential energy, in the case of the elastic band it’s called elastic potential energy.
– Once we release the band and it unravels it becomes kinetic energy.
– Kinetic Energy is the energy of motion, this will be the energy that moves our Lego car.
The Building
Here’s how we make a simple Lego car:
– You don’t need too many parts to get going.
– They don’t have to be these exact parts. That’s the joy of Lego there’s always a couple of solutions by using different bricks. Also you can use different size axles.
– Either follow the instructions below, or watch the video!
Step by Step Instructions
- Make the Chassis by connecting the Lego Technic 4×2 (x2) and the 1×15 (x2) together – one 4×2 needs to go across the first two studs of each 1×15, leaving a four stud gap between each 1×15. The other 4×2 needs to go on the 2nd and 3rd studs at the other end of the 1×15’s.
- Attach the front wheels, take one wheel and put it on the end of a axle, start to put the axle through the first hole of the 1×15 at the end of the chassis showing the first stud of the 1×15, as the axle comes through place the two spacer studs onto the axle and push it through and attach the other wheel.Make sure the axle turns freely.
- Place the Technic Pin in the middle of the 4×2 at the front of the car – this will hold the elastic band.
- Attaching the rear wheels, attach one wheel to the axle and start pushing it through the fourth hole on the 1×15, as it comes through put one of the slimmer spacers on, then the joiner piece, then the last of the slimmer spacer. now push the axle through and put the wheel on. Make sure the axle turns freely.
- Time to attach the elastic band, pop one end on the securing pin at the front and the other end on the joiner piece and wind the band around the axle by turning the wheel, now let it go and watch it go.
So, how did the first drive go?
They don’t always work straight away and sometimes need a few adjustments to get them going at their best.
Here’s a few key points in achieving the best results, most of my little engineers can see the issues and enjoy finding the solutions.
- Keeping the wheels aligned is very important, if the move around or wobble, they tend to stick or jam up which stops smooth motion.
- Stopping the band from slipping, attaching it well is key. Experiment with different fixings.
- Friction between the car and surface, different types of wheels can offer solutions here. The size can also play a factor.
- Keeping the chassis rigid is also important. This is why we use the 4×2 plates at each end. If you go further and extend the length you might need to add more support to the chassis.
Want to know how fast your Lego creation is?
You can work this out by collecting some information from each run. You can then compare what combination work best.
To work out speed we use this sum (equation) you’ll need a tape measure, stop watch and maybe a calculator.
– Speed = distance\time
Position your Lego vehicle at your start line.
Get your Lego vehicle ready to go and have the stop watch ready. Time your vehicle from the moment it moves till it stops.
Now measure from your start line to the finishing point.
Now put your results into the sum and see how fast it went!!
What can we learn from this?
As well as the science and engineering, It shows the importance of building well, which helps with dexterity and deftness. If building in a group it promotes team work and effective communication, as well as problem solving.
Try This – what happens if you use different types of elastic band? Does the vehicle move quicker or go for longer?
Try This – what differences are there if you have a longer or shorter vehicle.
Try This – can you use different wheels? What happens with thinner wheels?
Extra – You can also use balloons instead of elastic bands, maybe you could explore how different using a band and balloon are or even build two vehicles and have a race. Here’s how to add a ballon… I wonder if you could have band and balloon on the same car!?
That’s all for now – check back soon for more Lego Sense posts, videos, tutorials and ideas, happy building! Feel free to share the post with your friends too!
Nick


One thought on “Elastic Band Lego Cars”